
This is an old revision of the document!
Table of Contents
KVM and libvirt inside a VPS
Installing libvirt
vpsAdminOS runs VPSes as containers, not as virtual machines. KVM inside a VPS
is therefore not nested virtualization: virtual machines use the physical
node's hardware virtualization directly. This guide uses the current Debian
(latest) template, libvirt and the qemu:///system system connection.
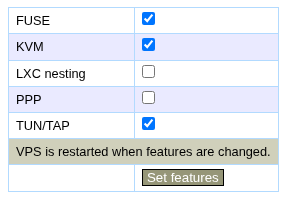
The KVM feature is required for virtualization. TUN/TAP is required for TAP-based virtual-machine network interfaces. Both features are enabled by default for new VPSes in the Features section of the VPS detail in vpsAdmin.
Install QEMU, libvirt and virt-install from Debian:
#!/usr/bin/env bash
set -euo pipefail

export DEBIAN_FRONTEND=noninteractive
apt-get update
apt-get install --yes \
  iptables \
  libvirt-clients \
  libvirt-daemon-system \
  qemu-system-x86 \
  qemu-utils \
  virtinst

virsh --connect qemu:///system version
Use the qemu:///system system connection. For remote administration, use
libvirt over SSH, for example qemu+ssh://root@HOST/system, and protect SSH
with a key. Do not expose an unencrypted libvirt TCP socket to the Internet.
Disk images and ZFS
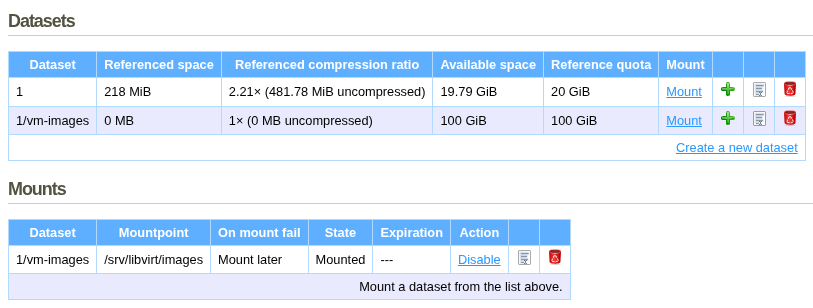
A separate subdataset is recommended for disk images.
It lets you change ZFS properties for this workload later without affecting the
VPS root dataset. Before creating virtual machines, reduce the root dataset's
reference quota by the capacity intended for images, create a vm-images
subdataset with the freed capacity, and mount it in the VPS at
/srv/libvirt/images. For example, from the standard 120 GiB allocation you
can leave 20 GiB for the root dataset and assign 100 GiB to vm-images. You
can then give the first virtual-machine disk 80 GiB and leave 20 GiB free for
growth and snapshots.
The subdataset is snapshotted separately from the VPS root dataset.
Add the mounted directory to libvirt as a persistent storage pool:
#!/usr/bin/env bash
set -euo pipefail

virsh --connect qemu:///system pool-define-as \
  vm-images dir --target /srv/libvirt/images
virsh --connect qemu:///system pool-start vm-images
virsh --connect qemu:///system pool-autostart vm-images
virsh --connect qemu:///system pool-info vm-images
Then create disks through libvirt, virt-install or virt-manager in the
vm-images pool.
Leave the subdataset's ZFS properties at their defaults unless measurements
show a reason to change them. Compression is enabled by default. The default
recordsize=128K is the maximum record size for files; ZFS uses smaller
records when appropriate. A recordsize change applies only to newly created
files.
For images on ZFS, raw is a suitable default because it does not add another
copy-on-write layer. Choose qcow2 when you need backing files, internal
snapshots, or other image-format features.
See OpenZFS Workload Tuning for workload-based tuning and the QEMU documentation for image formats.
Virtual-machine networking
The VPS network interface is connected to the node through a routed layer-3 link. Do not add the VPS interface to a bridge managed by libvirt. Two setups are suitable for connecting virtual machines:
| Setup | Addresses in the domain | Advantages | Disadvantages |
|---|---|---|---|
| libvirt NAT | Private IPv4 and private ULA IPv6 | Works with the ordinary VPS addresses and easily serves several domains. | Inbound services need port forwarding and traffic passes through NAT44 and NAT66. |
| Routed public addresses | A public IPv4 /32 and addresses from a separate IPv6 /64 | The domain is directly reachable, without NAT or port translation. | Requires a private IPv4 on the VPS, another routed IPv6 network, and a carefully configured firewall. |
NAT is usually simpler for one or a few domains with a small number of exposed services. Use routed addresses when a domain needs its own public addresses, all ports, or protocols that are awkward to handle with port forwarding. For backend-only communication between domains, you can attach another isolated libvirt network; outbound access still uses one of the setups above.
Public addresses on the VPS with dual-stack NAT
The public IPv4 /32 and IPv6 /64 remain on the VPS. The domain receives
192.168.124.10/24 and fd5f:6d2e:9c4a:124::10/64 from the
dualstack-nat network. Libvirt translates outbound IPv4 with NAT44 and IPv6
with NAT66. The default network in a typical libvirt installation is
normally IPv4-only and uses 192.168.122.0/24, so this example defines an
explicit dual-stack network with a distinct IPv4 subnet. NAT66 is enabled with
<nat ipv6='yes'/>; see the
libvirt network XML documentation for
details.
The ULA fd5f:6d2e:9c4a::/48 is an example for a standalone installation.
If you later join several private networks through a VPN or routing, generate a
different random ULA /48 for each network and change both HOST_IPV6 and
GUEST_IPV6 to addresses from the same /64.
The essential part of the network definition is:
<network>
  <name>dualstack-nat</name>
  <forward mode='nat'>
    <nat ipv6='yes'/>
  </forward>
  <bridge name='virbr-nat'/>
  <ip address='192.168.124.1' prefix='24'/>
  <ip family='ipv6' address='fd5f:6d2e:9c4a:124::1' prefix='64'/>
</network>
Attach the created domain to dualstack-nat, for example with
–network network=dualstack-nat,model=virtio in virt-install. Configure
stable addresses and gateways in the domain:
auto ens3
iface ens3 inet static
    address 192.168.124.10/24
    gateway 192.168.124.1

iface ens3 inet6 static
    address fd5f:6d2e:9c4a:124::10/64
    gateway fd5f:6d2e:9c4a:124::1
A port forward consists of DNAT to the domain address and permission for the corresponding forwarded traffic. For an IPv4 web service, these are the essential commands:
iptables -t nat -I PREROUTING 1 -p tcp -d VPS_IPV4 --dport 80 \
  -j DNAT --to-destination 192.168.124.10:80
iptables -t filter -I FORWARD 1 -p tcp -d 192.168.124.10 --dport 80 \
  -j ACCEPT
Equivalent ip6tables rules are needed for IPv6. Rules entered by hand,
however, are not preserved across libvirt network changes. The complete script
below therefore creates the network, a forwarding configuration file, and a
hook that restores the rules when the network starts or reconnects. By default,
it exposes the domain's web service on port 80 and SSH on port 2222 over both
IPv4 and IPv6.
Save it as, for example, /root/configure-nat-port-forwards.sh, then run it
with one public IPv4 and one address from the VPS IPv6 /64 configured on the
VPS:
PUBLIC_IPV4=VPS_IPV4 PUBLIC_IPV6=VPS_IPV6 \
  /root/configure-nat-port-forwards.sh
Run the script when creating the network and again when changing its input values, not after every VPS reboot. The network is set to autostart and its hook loads the rules when it starts.
#!/usr/bin/env bash
set -euo pipefail

: "${PUBLIC_IPV4:?set PUBLIC_IPV4 to the VPS public IPv4 address}"
: "${PUBLIC_IPV6:?set PUBLIC_IPV6 to a public IPv6 address of the VPS}"

guest_ipv4=${GUEST_IPV4:-192.168.124.10}
guest_ipv6=${GUEST_IPV6:-fd5f:6d2e:9c4a:124::10}
host_ipv4=${HOST_IPV4:-192.168.124.1}
host_ipv6=${HOST_IPV6:-fd5f:6d2e:9c4a:124::1}
connection=qemu:///system
network=dualstack-nat
hook=/etc/libvirt/hooks/network.d/50-port-forwards
config=/etc/libvirt/port-forwards.conf
xml=$(mktemp)
trap 'rm -f "$xml"' EXIT

network_uuid=$(virsh --connect "$connection" net-uuid "$network" 2>/dev/null || :)
uuid_element=
if [[ -n $network_uuid ]]; then
  uuid_element="  <uuid>$network_uuid</uuid>"
fi
cat >"$xml" <<EOF
<network>
  <name>$network</name>
$uuid_element
  <forward mode='nat'>
    <nat ipv6='yes'/>
  </forward>
  <bridge name='virbr-nat' stp='on' delay='0'/>
  <ip address='$host_ipv4' prefix='24'>
    <dhcp>
      <range start='192.168.124.100' end='192.168.124.254'/>
    </dhcp>
  </ip>
  <ip family='ipv6' address='$host_ipv6' prefix='64'/>
</network>
EOF

if virsh --connect "$connection" net-list --name \
  | grep -Fx "$network" >/dev/null; then
  printf '%s is active. Shut down its attached domains, run ' "$network" >&2
  printf 'virsh net-destroy %s, then rerun this script.\n' "$network" >&2
  exit 1
fi

install -d -m 0755 /etc/libvirt/hooks/network.d
install -d -m 0755 /etc/libvirt
cat >"$hook" <<'HOOK'
#!/usr/bin/env bash
set -euo pipefail

PATH=/usr/sbin:/usr/bin:/sbin:/bin
network=${1-}
action=${2-}
config=/etc/libvirt/port-forwards.conf
nat_chain=VPSFREE_KVM_DNAT
filter_chain=VPSFREE_KVM_FWD

[[ $network == dualstack-nat ]] || exit 0
exec 9>/run/lock/vpsfree-kvm-port-forwards.lock
flock 9

delete_jumps() {
  local tool
  for tool in iptables ip6tables; do
    while "$tool" -w -t nat -C PREROUTING -j "$nat_chain" 2>/dev/null; do
      "$tool" -w -t nat -D PREROUTING -j "$nat_chain"
    done
    while "$tool" -w -t filter -C FORWARD -j "$filter_chain" 2>/dev/null; do
      "$tool" -w -t filter -D FORWARD -j "$filter_chain"
    done
  done
}

delete_chains() {
  local tool
  for tool in iptables ip6tables; do
    if "$tool" -w -t nat -S "$nat_chain" >/dev/null 2>&1; then
      "$tool" -w -t nat -F "$nat_chain"
      "$tool" -w -t nat -X "$nat_chain"
    fi
    if "$tool" -w -t filter -S "$filter_chain" >/dev/null 2>&1; then
      "$tool" -w -t filter -F "$filter_chain"
      "$tool" -w -t filter -X "$filter_chain"
    fi
  done
}

cleanup() {
  delete_jumps
  delete_chains
}

valid_ip_address() {
  local family=$1 address=$2

  perl -MSocket=AF_INET,AF_INET6,inet_pton -e '
    my ($family, $address) = @ARGV;
    my $af = $family eq "ipv4" ? AF_INET : AF_INET6;
    exit(defined(inet_pton($af, $address)) ? 0 : 1);
  ' "$family" "$address"
}

if [[ $action == stopped ]]; then
  cleanup
  exit 0
fi
[[ $action == started || $action == reconnect ]] || exit 0

entries=()
while read -r family protocol public_ip public_port guest_ip guest_port extra \
    || [[ -n ${family:-} ]]; do
  [[ -n ${family:-} && $family != \#* ]] || continue
  [[ $family == ipv4 || $family == ipv6 ]] || {
    printf 'Invalid address family in %s: %s\n' "$config" "$family" >&2
    exit 1
  }
  [[ $protocol == tcp || $protocol == udp ]] || {
    printf 'Invalid protocol in %s: %s\n' "$config" "$protocol" >&2
    exit 1
  }
  for address in "$public_ip" "$guest_ip"; do
    valid_ip_address "$family" "$address" || {
      printf 'Invalid %s address in %s: %s\n' \
        "$family" "$config" "$address" >&2
      exit 1
    }
  done
  [[ $public_port =~ ^[0-9]{1,5}$ && $guest_port =~ ^[0-9]{1,5}$ ]] || {
    printf 'Invalid port in %s\n' "$config" >&2
    exit 1
  }
  public_port=$((10#$public_port))
  guest_port=$((10#$guest_port))
  ((public_port >= 1 && public_port <= 65535)) || exit 1
  ((guest_port >= 1 && guest_port <= 65535)) || exit 1
  [[ -z ${extra:-} ]] || {
    printf 'Too many fields in %s\n' "$config" >&2
    exit 1
  }
  entries+=("$family|$protocol|$public_ip|$public_port|$guest_ip|$guest_port")
done <"$config"

cleanup
for tool in iptables ip6tables; do
  "$tool" -w -t nat -N "$nat_chain"
  "$tool" -w -t filter -N "$filter_chain"
done
for entry in "${entries[@]}"; do
  IFS='|' read -r family protocol public_ip public_port guest_ip guest_port \
    <<<"$entry"
  tool=iptables
  destination="$guest_ip:$guest_port"
  if [[ $family == ipv6 ]]; then
    tool=ip6tables
    destination="[$guest_ip]:$guest_port"
  fi
  "$tool" -w -t nat -A "$nat_chain" -p "$protocol" -d "$public_ip" \
    --dport "$public_port" -j DNAT --to-destination "$destination"
  "$tool" -w -t filter -A "$filter_chain" -p "$protocol" -d "$guest_ip" \
    --dport "$guest_port" -j ACCEPT
done
for tool in iptables ip6tables; do
  "$tool" -w -t nat -I PREROUTING 1 -j "$nat_chain"
  "$tool" -w -t filter -I FORWARD 1 -j "$filter_chain"
done
HOOK
chmod 0755 "$hook"

cat >"$config" <<EOF
# FAMILY PROTOCOL PUBLIC_IP PUBLIC_PORT GUEST_IP GUEST_PORT
ipv4 tcp $PUBLIC_IPV4 80 $guest_ipv4 80
ipv4 tcp $PUBLIC_IPV4 2222 $guest_ipv4 22
ipv6 tcp $PUBLIC_IPV6 80 $guest_ipv6 80
ipv6 tcp $PUBLIC_IPV6 2222 $guest_ipv6 22
EOF

virsh --connect "$connection" net-define "$xml"
virsh --connect "$connection" net-autostart "$network"
systemctl restart libvirtd.service
if ! virsh --connect "$connection" net-list --name \
  | grep -Fx "$network" >/dev/null; then
  virsh --connect "$connection" net-start "$network"
fi
"$hook" "$network" started begin -
virsh --connect "$connection" net-dumpxml "$network"
Add another port to /etc/libvirt/port-forwards.conf as
FAMILY PROTOCOL PUBLIC_IP PUBLIC_PORT GUEST_IP GUEST_PORT. For example,
expose HTTPS on port 8443 over both protocols with:
ipv4 tcp VPS_IPV4 8443 192.168.124.10 443
ipv6 tcp VPS_IPV6 8443 fd5f:6d2e:9c4a:124::10 443
The supported protocols are tcp and udp. A syntactically invalid line
is rejected before the active rules are changed. Reload the rules after editing
the file:
/etc/libvirt/hooks/network.d/50-port-forwards dualstack-nat started begin -
Port 2222 keeps the domain's SSH service separate from SSH on the VPS itself. Restrict the VPS firewall further according to who should reach each service.
Private IPv4 on the VPS with public addresses in the domain
In this setup, the VPS has a private IPv4 /32 and its ordinary public IPv6
/64. The domain receives a public IPv4 /32 and an address from a
separate IPv6 /64 routed through an address in the VPS's first /64. The
private VPS IPv4 works on the internal vpsFree.cz network and reaches the
Internet through NAT on our routers; libvirt does not translate the domain's
public addresses.
For IPv4, first ask support to assign a private IPv4 /32 to the VPS.
Under Networking → Routable addresses, select the public /32 in
Address, the VPS private address in Via, and the target VPS interface.
The public address is not configured on any interface inside the VPS; vpsAdminOS
routes it to the VPS via the private address.
For IPv6, use another /64 available to you under Networking → Routable
addresses and route it through an address in the VPS's ordinary /64. If
you already have a larger routed network such as a /48, select a dedicated
/64 from it for the domain. Use the first address of this second /64 as
the gateway on the libvirt bridge; for example, ROUTED_IPV6_PREFIX::1 for
ROUTED_IPV6_PREFIX::/64.
IPv4 uses a small transit network only between the VPS and the domain:
Internet → public /32 → VPS → 192.168.123.1/30
                                 ↓
                           192.168.123.2/30 → public /32 in the domain
In the libvirt XML, the public IPv4 is a separate route through the domain's
transit address. The routed IPv6 /64, on the other hand, is directly on the
bridge:
<network>
  <name>public-routed</name>
  <forward mode='open'/>
  <bridge name='virbr-public'/>
  <ip address='192.168.123.1' prefix='30'/>
  <ip family='ipv6' address='ROUTED_IPV6_PREFIX::1' prefix='64'/>
  <route family='ipv4' address='PUBLIC_IPV4' prefix='32'
         gateway='192.168.123.2'/>
</network>
The VPS must forward both protocols:
sysctl -w net.ipv4.ip_forward=1
sysctl -w net.ipv6.conf.all.forwarding=1
The following script creates this network and persists forwarding in
/etc/sysctl.d/90-libvirt-routing.conf. Save it as, for example,
/root/configure-routed-network.sh and run it with the routed IPv4 and the
first address of the routed IPv6 /64:
PUBLIC_IPV4=PUBLIC_IPV4 \
IPV6_GATEWAY=ROUTED_IPV6_PREFIX::1 \
  /root/configure-routed-network.sh
As with NAT, run the script when creating the network or changing its
addresses. Network autostart and the settings in /etc/sysctl.d handle VPS
reboots.
#!/usr/bin/env bash
set -euo pipefail

: "${PUBLIC_IPV4:?set PUBLIC_IPV4 to the routed public IPv4 address}"
: "${IPV6_GATEWAY:?set IPV6_GATEWAY to the first address of the routed IPv6 /64}"

host_transit_ipv4=${HOST_TRANSIT_IPV4:-192.168.123.1}
guest_transit_ipv4=${GUEST_TRANSIT_IPV4:-192.168.123.2}
connection=qemu:///system
network=public-routed
forwarding_config=/etc/sysctl.d/90-libvirt-routing.conf
xml=$(mktemp)
trap 'rm -f "$xml"' EXIT

export LC_ALL=C
network_uuid=$(virsh --connect "$connection" net-uuid "$network" 2>/dev/null || :)
uuid_element=
if [[ -n $network_uuid ]]; then
  uuid_element="  <uuid>$network_uuid</uuid>"
fi
cat >"$xml" <<EOF
<network>
  <name>$network</name>
$uuid_element
  <forward mode='open'/>
  <bridge name='virbr-public' stp='on' delay='0'/>
  <ip address='$host_transit_ipv4' prefix='30'/>
  <ip family='ipv6' address='$IPV6_GATEWAY' prefix='64'/>
  <route family='ipv4' address='$PUBLIC_IPV4' prefix='32'
         gateway='$guest_transit_ipv4'/>
</network>
EOF

if virsh --connect "$connection" net-list --name \
  | grep -Fx "$network" >/dev/null; then
  printf '%s is active. Shut down its attached domains, run ' "$network" >&2
  printf 'virsh net-destroy %s, then rerun this script.\n' "$network" >&2
  exit 1
fi

install -d -m 0755 "$(dirname "$forwarding_config")"
cat >"$forwarding_config" <<'EOF'
net.ipv4.ip_forward = 1
net.ipv6.conf.all.forwarding = 1
EOF
sysctl --quiet --load "$forwarding_config"

virsh --connect "$connection" net-define "$xml"
virsh --connect "$connection" net-autostart "$network"
virsh --connect "$connection" net-start "$network"
virsh --connect "$connection" net-dumpxml "$network"
If the network is already active, the script leaves it unchanged. Shut down its
attached domains, stop it with virsh net-destroy public-routed, rerun the
script, and start the domains again. The script preserves the existing network
UUID.
Attach the domain to public-routed. In a Debian guest, for example, save the
following as /etc/network/interfaces.d/public-routed; replace ens3,
PUBLIC_IPV4, GUEST_IPV6, and IPV6_GATEWAY with the actual values:
auto ens3
iface ens3 inet static
    address 192.168.123.2/30
    up ip address add PUBLIC_IPV4/32 dev ens3
    up ip route replace default via 192.168.123.1 src PUBLIC_IPV4
    down ip address del PUBLIC_IPV4/32 dev ens3

iface ens3 inet6 static
    address GUEST_IPV6/64
    gateway IPV6_GATEWAY
forward mode='open' leaves filtering of forwarded traffic to the VPS
firewall. Allow only traffic that the domain should receive, and remember rules
for both IPv4 and IPv6. The public IPv4 is configured only in the domain. The
IPv6 gateway and domain addresses come from the second, routed /64; only an
address from the VPS's ordinary /64 remains on its outer interface. Neither
protocol uses NAT in this setup.
Installer ISO on NFS
It is safer to copy an installer ISO to a local dataset first. On an older NFSv3
export without working network locking, QEMU can hang while waiting for a lock
or fail with an error such as Failed to lock byte 100 or
Failed to get … lock.
For one client and a read-only installer ISO only, you can use nolock:
#!/usr/bin/env bash
set -euo pipefail

: "${NFS_SERVER:?set NFS_SERVER to the NAS server address}"
: "${NFS_EXPORT:?set NFS_EXPORT to the exported dataset path}"

mountpoint=${ISO_MOUNTPOINT:-/mnt/installer-iso}
install -d -m 0755 "$mountpoint"
mount -t nfs -o ro,vers=3,nolock \
  "${NFS_SERVER}:${NFS_EXPORT}" "$mountpoint"

findmnt --noheadings --output FSTYPE,OPTIONS --target "$mountpoint"
nolock disables NLM network locking, so other clients do not see local
locks. Never use it for a writable or shared virtual-machine disk. Locking is
part of the NFSv4 protocol and this option is not a solution there. See
nfs(5).


