This is an old revision of the document!
Table of Contents
Datasets
The dataset in vpsAdmin directly represents the ZFS dataset on the hard drive. Datasets are used for VPS and NAS data. The concept of a dataset replaces NAS exports. A VPS dataset can be used the same way as an NAS.
Why should we even bother with datasets? Especially because of the option to set quotas and ZFS properties for various data/apps.
VPS datasets are located in the VPS details and NAS datasets are in the NAS menu. The operations you can carry out with them are the same. VpsAdmin enables creating subdatasets and configuring ZFS properties.
You can use the properties to optimize database performance, etc. In most cases you don’t need to deal with them at all.
Reserved dataset names are: private, vpsadmin, branch-* and tree.*.
These names cannot be used.
Dataset Size and the Space Taken Up
There are three columns in the list of datasets: Used space, Referenced space and Available space. Used space includes the space taken up by the dataset, its snapshots and all children. Referenced space only displays the space that the given dataset takes up, neither snapshots nor subsets are included.
Available space displays free space in the current dataset in relation to its set quota.
Dataset Quotas
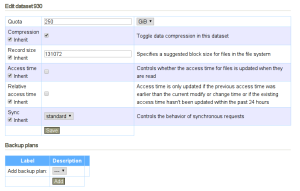
Reference quota is used for VPS datasets – the space taken up by snapshots and subdatasets is not included. On the other hand, NAS datasets use Quota – the space taken up by snapshots and subdatasets is included. VpsAdmin automatically suggests the correct type of quota depending on the context.
In the case of VPS, we don’t want the space taken up by snapshots to be included in the taken up space since this would reduce the VPS drive size by the amount of data that all the created snapshots take up. Each dataset is separate and it doesn’t share space with its parent datasets, nor with its children.
On the other hand, NAS uses the Quota property, which includes the space taken up
by snapshots and subdatasets. If snapshots are made on the NAS, they will
take up space from the total. It plays no role that the NAS subdataset can be
assigned a bigger quota than the user has at their disposal since it is the quota from
the top-level dataset that is applied, i.e. in the default state the value is 250 GB.
This means thatin order to create a VPS subdataset, we first need to free up space, i.e. another VPS (sub)dataset needs to be shrunk by at least 10 GB. On an NAS, only the quota from the highest-level dataset is applied and the subdataset quotas can have any settings.
Snapshots
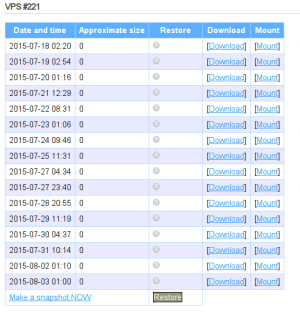
Backups are made using ZFS snapshots, which can be seen in the Backups menu. They can be created in the very same menu. The created VPS snapshots cannot be deleted, you have to wait until they are automatically overwritten by further daily backups.
VPS backups are made every day at 1:00 AM, when one node creates a snapshot of all the datasets at once. Then the snapshots are moved to backuper.prg.
Attention! NAS is not backed up to backuper.prg. Snapshots are local only and their only purpose is protection against the damage or unwanted deletion of data.
Mounts
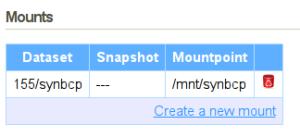
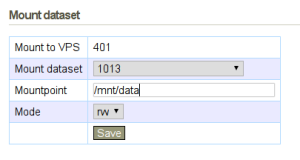
Mounts can be seen in the VPS details. Both datasets and snapshots can be mounted. Any dataset or snapshot can be mounted to any VPS. Mounts of individual snapshots replace a permanent backup mount to /vpsadmin_backuper.
Each snapshot can only have one mount at any given moment, datasets have no such limitation.
I do not recommend nesting mount points in the incorrect order. The situation when a “one/two” dataset is mounted above the “one” dataset has not been solved.
Mounts can be temporarily disabled using the “Disable/Enable” button. This setting is persistent between VPS restarts.
Restoring Backups
Restoring a VPS from a backup (snapshot) works the same way as it has until now. Restoring always works on the dataset level. If a VPS has subdatasets, rootfs is restored from the backup, subdatasets are not restored. I.e. it is possible to restore any dataset and this doesn’t have any effect on other datasets. During the restore process, all snapshots are stored thanks to the fact that backups in the backuper are branched.
You can only make snapshots of an NAS manually. Since it is not backed up to the
backuper, the restore process behaves the same way as zfs rollback -r, i.e. restoring to
an older snapshot deletes all newer snapshots. It is an irreversible operation.
In order to restore data from a backup on an NAS without deleting snapshots, mount the selected snapshot to a VPS and copy the data.
Downloading Backups
Backups can be either downloaded through an online interface or a CLI. The CLI has the advantage of not having to wait for an e-mail with a link to the backup download location – we can start the download immediately or automate the whole process. We can either download a tar.gz archive or the ZFS data stream directly (even incrementally).
Incremental Backups
An incremental backup only contains the data that has changed since the previous snapshot. In order to help the client identify which snapshots can be downloaded incrementally, each snapshot contains a history indicator (number). Snapshots with the same identifier can be moved incrementally. The history flow can be interrupted by a VPS reinstallation or using a backup to restore. Afterwards, the history identifier is increased by 1 and the full backup needs to be downloaded again.
The history identifier is shown in the table with a list of snapshots in the Backups menu.
Downloading the Backup as a File
$ vpsfreectl snapshot download --help
snapshot download [SNAPSHOT_ID]      Download a snapshot as an archive or a stream

Command options:
    -f, --format FORMAT              archive, stream or incremental_stream
    -I, --from-snapshot SNAPSHOT_ID  Download snapshot incrementally from SNAPSHOT_ID
    -d, --[no-]delete-after          Delete the file from the server after successful download
    -F, --force                      Overwrite existing files if necessary
    -o, --output FILE                Save the download to FILE
    -q, --quiet                      Print only errors
    -r, --resume                     Resume cancelled download
    -s, --[no-]send-mail             Send mail after the file for download is completed
    -x, --max-rate N                 Maximum download speed in kB/s
        --[no-]checksum              Verify checksum of the downloaded data (enabled)
If the snapshot ID isn’t passed on to the program as an argument, it displays an interactive prompt:
$ vpsfreectl snapshot download
Dataset 14
  (1) @2015-12-04T00:00:02Z
VPS #198
  (2) @2015-12-01T09:08:28Z
  (3) @2015-12-01T09:10:10Z
  (4) @2015-12-01T11:25:55Z
  (5) @2015-12-01T11:36:03Z
  (6) @2015-12-01T11:54:51Z
  (7) @2015-12-01T11:55:19Z
  (8) @2015-12-01T12:02:27Z
  (9) @2015-12-01T12:27:50Z
  (10) @2015-12-01T12:37:50Z
  (11) @2015-12-01T12:55:46Z
  (12) @2016-02-29T09:56:03Z
  (13) @2016-02-29T10:08:31Z
  (14) @2016-02-29T10:08:35Z
Pick a snapshot for download:
We will be downloading the 4th snapshot (@2015-12-01T11:25:55Z):
Pick a snapshot for download: 4
The download is being prepared...
Downloading to 198__2015-12-01T12-25-56.tar.gz
Time: 00:01:37 Downloading 0.3 GB: [=====================================================================================] 100% 992 kB/s
Using the --format option we choose whether we want to download a tar.gz archive, a data
stream or an incremental data stream. Under default settings, the tar.gz archive
is downloaded.
We can either let vpsAdmin name the file
(SnapshotDownload#Show.file_name),
or choose our own location using the --output option. If --output=- is used,
the output is redirected to stdout.
The program enables pausing the download (you need to use CTRL+C) and then resuming it
again. If the --resume or --force options are not used,
the program asks the user whether it should resume the download or start
over.
-[no-]delete-after option), which takes as long as a week since the first
download attempt.
ZFS Data Stream
$ vpsfreectl snapshot send --help
snapshot send SNAPSHOT_ID            Download a snapshot stream and write it on stdout

Command options:
    -I, --from-snapshot SNAPSHOT_ID  Download snapshot incrementally from SNAPSHOT_ID
    -d, --[no-]delete-after          Delete the file from the server after successful download
    -q, --quiet                      Print only errors
    -s, --[no-]send-mail             Send mail after the file for download is completed
    -x, --max-rate N                 Maximum download speed in kB/s
        --[no-]checksum              Verify checksum of the downloaded data (enabled)
The difference from snapshot download is that a data stream is written directly to stdout
in an uncompressed form so that we can mount it directly from
zfs recv:
$ vpsfreectl snapshot send <id> | zfs recv -F <dataset>
An incremental data stream can be requested using the -I, --from-snapshot option
$ vpsfreectl snapshot send <id2> -- --from-snapshot <id1> | zfs recv -F <dataset>
Automated Backup Downloads
Automated backup downloads are performed using the backup vps and
backup dataset commands. They are used the same way, the only difference being that the former uses the VPS ID as its argument
while the latter uses the dataset ID.
These commands require ZFS to be installed, zpool to be created and root permissions. The program can be run directly under root, otherwise it will use sudo when running.
Upon startup, snapshots with the current history identifier are downloaded, as long as they do not exist locally yet. If possible, they are downloaded incrementally. In order for incremental transfer to work, the program must find the snapshot which is present locally and on the server at the same time. This means that backups have to be downloaded at least once every 14 days since the newest local snapshot gets deleted from the server after that time period and the program won’t be able to resume downloading backups – there won’t be any common snapshot.
$ vpsfreectl backup vps --help
backup vps [VPS_ID] FILESYSTEM       Backup VPS locally

Command options:
    -p, --pretend                    Print what would the program do
    -r, --[no-]rotate                Delete old snapshots (enabled)
    -m, --min-snapshots N            Keep at least N snapshots (30)
    -M, --max-snapshots N            Keep at most N snapshots (45)
    -a, --max-age N                  Delete snapshots older then N days (30)
    -x, --max-rate N                 Maximum download speed in kB/s
    -q, --quiet                      Print only errors
    -s, --safe-download              Download to a temp file (needs 2x disk space)
        --retry-attemps N            Retry N times to recover from download error (10)
    -i, --init-snapshots N           Download max N snapshots initially
        --[no-]checksum              Verify checksum of the downloaded data (enabled)
    -d, --[no-]delete-after          Delete the file from the server after successful download (enabled)
        --no-snapshots-as-error      Consider no snapshots to download as an error
        --[no-]sudo                  Use sudo to run zfs if not run as root (enabled)
If the program does not receive the VPS/Dataset ID as an argument, it either asks the user for it
or it tries to identify the ID itself. The FILESYSTEM argument always needs to be
provided. It should contain the name of the dataset where we want to store the backups.
Before we actually run the program, the --pretend option might come in handy – it
shows us what the program would do, i.e. which snapshots it would download and potentially
delete.
The --[no-]rotate option can be used to (de)activate the deletion of older snapshots in order to
make room for the new ones. Unless we change other settings, we will have at least
30 snapshots (which currently means 30 daily histories) and a maximum of 45 snapshots
(if we create some ourselves) and snapshots older than 30 days will be
deleted.
The content of the FILESYSTEM dataset is managed by the program itself and the user
should not create more subdatasets/snapshots in it. The downloaded snapshots are placed in
subdatasets, which are named according to the history identifier.
Usage Example
$ vpsfreectl backup vps storage/backup/199
(1) VPS #198
(2) VPS #199
(3) VPS #202
Pick a dataset to backup: 2
Will download 8 snapshots:
  @2016-03-07T18:12:58
  @2016-03-07T18:13:21
  @2016-03-07T18:18:35
  @2016-03-10T10:18:03
  @2016-03-10T10:18:30
  @2016-03-10T11:49:00
  @2016-03-10T14:28:00
  @2016-03-10T14:33:12

Performing a full receive of @2016-03-07T18:12:58 to storage/backup/199/1
The download is being prepared...
Time: 00:00:56 Downloading 0.3 GB: [====================================================================================] 100% 1755 kB/s
Performing an incremental receive of @2016-03-07T18:12:58 - @2016-03-10T14:33:12 to storage/backup/199/1
The download is being prepared...
Time: 00:00:00 Downloading 0.0 GB: [=======================================================================================] 100% 0 kB/s
We can notice that the program downloads the first snapshot in full size and all the following ones incrementally.
A list of snapshots can be displayed using zfs list:
$ sudo zfs list -r -t snapshot storage/backup/199
NAME                                       USED  AVAIL  REFER  MOUNTPOINT
storage/backup/199/1@2016-03-07T18:12:58     8K      -   284M  -
storage/backup/199/1@2016-03-07T18:13:21     8K      -   284M  -
storage/backup/199/1@2016-03-07T18:18:35     8K      -   284M  -
storage/backup/199/1@2016-03-10T10:18:03     8K      -   285M  -
storage/backup/199/1@2016-03-10T10:18:30     8K      -   285M  -
storage/backup/199/1@2016-03-10T11:49:00   160K      -   285M  -
storage/backup/199/1@2016-03-10T14:28:00   160K      -   285M  -
storage/backup/199/1@2016-03-10T14:33:12      0      -   285M  -
We can access our own data using the special .zfs folder:
$ ls -1 /storage/backup/199/1/.zfs/snapshot
2016-03-07T18:12:58
2016-03-07T18:13:21
2016-03-07T18:18:35
2016-03-10T10:18:03
2016-03-10T10:18:30
2016-03-10T11:49:00
2016-03-10T14:28:00
2016-03-10T14:33:12
Cron can be used to download backups regularly. The crontab record can look like this:
MAILTO=your@email

# Example of job definition:
# .---------------- minute (0 - 59)
# |  .------------- hour (0 - 23)
# |  |  .---------- day of month (1 - 31)
# |  |  |  .------- month (1 - 12) OR jan,feb,mar,apr ...
# |  |  |  |  .---- day of week (0 - 6) (Sunday=0 or 7) OR sun,mon,tue,wed,thu,fri,sat
# |  |  |  |  |
# *  *  *  *  * user-name command to be executed
  0  7  *  *  * root      vpsfreectl backup vps 199 storage/backup/199 -- --max-rate 1000
This means that the program runs every day at 7:00 AM (at this point, the backups
in vpsFree should already have been be moved to backuper.prg) the backups will be downloaded using a maximum speed of
1 MB/s. Cron will send us the output of the command to the email set in the
MAILTO variable. However, if we just want to check if it works, it is unnecessary for the email to be sent every day.
This is why the program has the --quiet option, which ensures that only potential
errors are printed.
vpsfreectl was installed
by a standard user, the program has to be
nainstalled again with all dependencies.
Downloading a Full Backup Using a Slow/Unreliable Connection
With default settings, the backup command does not enable us to pause and resume the download
since it doesn’t download the data to a file, but it directly sends it to ZFS. If we only have
a slow and unreliable connection at our disposal, it can happen that the download
fails and it is necessary to start over. However, we can use the
--safe-download option to help ourselves. The option first downloads the data as a file and only then
does it send it to ZFS. Because of this, the download can be paused and later
resumed at any point. The disadvantage of this procedure is that it requires twice as much space on the hard drive since the data
is simultaneously stored in a temporary file and the ZFS dataset. The temporary file is created
in the folder from which the program is running.
Another problem can be encountered after a long period of downloading. This is because when the program is first started,
it downloads all snapshots from the oldest to the newest one. If, however,
downloading the oldest snapshot takes too long, it can be deleted from the
server, which causes us to be unable to use it for incremental downloads later on and
we have to download the full backup again. To solve cases like this one, there is the
--init-snapshots N option, which tells the program that we only want to download N
most recent snapshots. The safest method is using --init-snapshots 1, then
we have 14 days to finish the download (the last pause can occur after 7
days). However, this is no cure-all since if the program is closed and run again on a different day,
the last snapshot will be different and the download process will start over unless
--init-snapshots has the proper value.
Detecting Missing Backups
Sometimes it can happen that the daily backup doesn’t occur and so the program doesn’t have
anything to download. This situation typically isn’t considered an error – all the
snapshots have simply been downloaded and the program doesn’t have anything to do. However, if
backups are downloaded automatically using Cron, we have no way of finding out that
no backups are being downloaded. This is why the program has the
--no-snapshots-as-error option, which ensures that if the program doesn’t have anything to
download, it returns an error. Errors are not hidden by the --quiet option,
so Cron will send it to us via email and we will find out about the outage.
Downloading backups with a standard user account using sudo
If we don’t want to install or run vpsfree-client using the root user, the program can
run under an unprivileged user as well. In this case, sudo is used in order to work with ZFS.
In the following example, we will install and use the program under the user
vpsfree. First we create the user and install vpsfree-client:
# useradd -m -d /home/vpsfree -s /bin/bash vpsfree
# su vpsfree
$ gem install --user-install vpsfree-client
Add the following lines to /etc/sudoers.d/zfs:
Defaults:vpsfree !requiretty
vpsfree ALL=(root) NOPASSWD: /sbin/zfs
The user vpsfree will be able to run zfs as a root user even without the password,
which is necessary if we want to run it using Cron.
Now we’ll try to run the program manually and then move it to the crontab. Let’s try requesting and saving an authentication token:
# su vpsfree
$ vpsfreectl --auth token --new-token --token-lifetime permanent --save user current
If you get an error stating that the program doesn’t exist, you will need to specify the whole
path or add the correct directory to $PATH. Gems are installed to
~/.gem/ruby/<Ruby version>/, on my system the path to the executables is specifically
/home/vpsfree/.gem/ruby/2.0.0/bin.
When we have a working client, we can download the first backup to the dataset that we
have created. In this example, VPS #123 will be backed up to the storage/backup/vps/123
dataset.
# su vpsfree
$ sudo zfs create -p storage/backup/vps/123
$ vpsfreectl backup vps 123 storage/backup/vps/123
We will use Cron for regular downloads of further backups.
Open the etc/cron.d/vpsfree file and add:
PATH=/bin:/usr/bin:/home/vpsfree/.gem/ruby/2.0.0/bin
MAILTO=your@email
HOME=/home/vpsfree

0 7 * * * vpsfree vpsfreectl backup vps storage/backup/vps/123 -- --quiet
PATH states the directory containing vpsfreectl. Note that
we no longer need to provide the VPS ID for the program – the program stores it when it runs the first time.
Downloading Backups Under a Standard User by Delegating Permissions
Solaris/OpenIndiana and FreeBSD enable delegating the permissions to control datasets to various users. In this case, the program does not need root permissions at all, and neither does it need sudo.
We will assign the required permissions to the user vpsfree.
# zfs create storage/backup/123
# zfs allow vpsfree create,mount,destroy,receive storage/backup/123
In order for the user to be able to create subdatasets and connect them, the user needs permissions on the directory and file levels:
# chown vpsfree:vpsfree /storage/backup/123
# sysctl vfs.usermount=1
Now we can start downloading the backups. We use the --no-sudo option to ensure that the
program doesn’t try to use sudo.
# su vpsfree
$ vpsfreectl backup vps 123 storage/backup/123 -- --no-sudo
General Options
--[no-]delete-afterdecides whether the downloaded file should be deleted from the server after a successful download attempt--[no-]send-mailindicates whether we want to receive emails informing us that the backup on the server is ready for download--max-rate Nsets the maximum download speed in kB/s--quietdisables all outputs, only errors are displayed--no-checksumturns off the checksum count and checks (sha256, which can cause delays)
Restoring Downloaded Backups
Restoring VPS from a downloaded backup so far isn’t automated in any way. One of the possible ways is mounting the VPS dataset that we want to restore to a different VPS (Playground) and copying the data. This method is described in the manual for repairing VPS.


